Moodle Best Practice Guide
Accessibility fundamentals
Check your existing content
Before you begin to work on new content, it's worth revisiting what you already provide students. Moodle provides a tool for checking your content for problems with accessibility, called the Accessibility Checker. This is a button found in the default text editor, Atto, which scans your content and warns you of any potential issues. This is a useful tool to double check your content, but it would not be advisable to totally rely on this check.
Moodle's Atto text editor documentation lists a number of different points that this tool will check your content for:
- Images with missing or empty alt text (unless they have the presentation role).

- Contrast of font colour and background colour meets WCAG AA guidelines.
- Long blocks of text are sufficiently broken up into headings.
- All tables require captions.
- Tables should not contain merged cells as they are difficult to navigate with screen readers.
- All tables should contain row or column headers.
How you can improve accessibility
#1 Add alt text to images
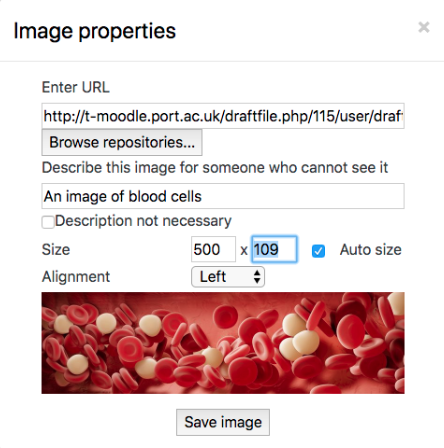
Adding alternate text (alt text) to images in Moodle is simple, won’t take you long and is essential to ensure screen readers are able to describe to the user what the image shows. When you add an image to your site, you’ll notice a box asking you to ‘describe this image for someone who cannot see it’, simply type in an informative and appropriate description for the image before you save it.
This is what gets added to the HTML code:
<img src="http://moodle.port.ac.uk/draftfile.php/115/user/draft/580539772/vacine2.jpg" alt="An image of blood cells" width="500" height="109" class="img-fluid border rounded">
Why this is important
Adding alt text in this way ensures a screen reader or other assistive technology is able to tell the user that the image is there, and what the image shows. Enabling them to have as much as a similar experience with the content you’ve produced as someone able to see the image.
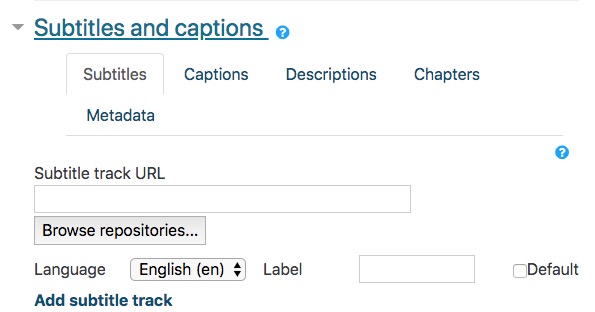
#2 Add audio transcripts to video
Transcripts for audio (and video) content are required by those who can’t hear to be able to consume audio that you may produce. If for example you produce a audio recording, you should also provide a text transcript of the audio. Moodle allows you to link subtitle, caption, description & chapter files to videos and audio you add to your sites via the interface shown in this image. You have to supply these as WebVTT files, which are designed to sit alongside video and audio. You may need to ask assistance from your Online Course Developers if you would like to create these types of files.
A Web Video Text Track (WebVTT) file is a standard format used to add captions to web video. The standard originated from the Web Hypertext Application Technology Working Group (WHATWG) specifically to support text tracks in HTML5. You can read more about this format, including this resource on how to structure a WebVTT file.
If your content is from YouTube, you’ll find that there is an automatic captioning feature that will attempt to convert the audio from speech to text, this is never perfect, but can often be a good starting point for you to be able to edit this text further.
Always check these automatic captions if you turn them on, sometimes they can provide some undesirable results!
Why this is important
Video transcriptions are helpful both for those with and without a hearing disability. Transcripts help those who are unable to listen to audio for whatever reason, or to cater to those users who simply prefer to read, rather than listen as they learn.
#3 Create meaningful structure
Your content should have a structure. Using headings in digital content doesn’t only make your information easier to read and navigate for everyone, it’s also vital for those who use assistive technologies as they navigate the page.
Below you can see a test page that we have created using the default Atto text editor in Moodle. It contains a series of headings with information beneath each one. We didn’t write this code, it was created by the editor when we selected the level of heading we wanted for each section:
<h3>All about Van Gogh</h3>
<p>This is the content that leads the page.</p>
<h4>His early life</h4>
<p>This title is useful for separating content into sections.</p>
<h4>Later life and his death</h4>
<p>This heading is the same level as the previous one, as this section holds information that is equal in importance to that of the first section.</p>
<h5>The loss of the ear</h5>
<p>This is a tertiary section, with a heading of a lower weight.</p>
What you can see from this is that in this content, the top level heading or ‘Heading (large)’ is coded as an <h3> tag in the code. This is because Moodle itself already uses the <h1> and <h2> tags in its structure. This is explained in more detail in the Typography section of the content guide
Why this is important
Users who rely on assistive technologies such as screen readers are unable to scan the entire screen at once, as people without a visual disability would be able to. These users rely on screen readers to go through content sequentially, reading out the structure of the page one section at a time. One of the ways you can mark the order of your content so this happens correctly is through appropriate use of HTML headings.
Moodle screenreader helper
The Screenreader Helper, again found in the default Atto editor, is used to improve the ability of a screen reader to ‘see’ into an editable box, such as the one you see when adding content to a page or book in Moodle. It is something that is useful for content creators that use assistive technologies rather than the audience for the content themselves.